Best Practices: Identifying and Blocking Spam
An Overview of Spam and the Realities of Ongoing Protection
Identifying how the Spam was Received
Reporting Spam to UpStream Support
How to block spam as an Email Administrator
Blocking the Sender by Address
Blocking the Sending IP Address or IP Range
Identifying and Blocking both Standard and Impersonation Spoofing
An Overview of Spam and the Realities of Ongoing Protection
We’ve all received spam and have a fairly good idea of what it is: undesired commercial email that wants us to buy something, go somewhere, click something or otherwise make someone else money.
More malicious variants, known as phishing emails, malware-laden emails and others also exist; these often get lumped together under the “spam” heading of undesired content and for the purposes of this article, they also fall under the same umbrella of steps that can be taken to deal with them.
With the emergence of spam back in the 1990s, the consequent desire to not receive it anymore also came about: email filters like UpStream were born to prevent those undesired messages from reaching your users. As it so often goes in the world of cybersecurity, it is a never-ending battle to not only keep up with the threats but to outright stay ahead of them. Every day, there are new threats and depending on how your organization is being targeted, a new or otherwise novel approach may be getting employed to try and reach your users.
In these scenarios, even with the multiple layers of defense and scanning that UpStream employs, it is possible for a spam message to get through and reach someone’s inbox. When these are detected and reported to you, there are a few different steps that can be taken to prevent them from recurring.
Scammers and Spammers alike use lots of clever methods to get their messages through, including spoofing internal users, masquerading as employees of well known companies (often vendors of your organization, known as supply chain attacks) and even as governmental agencies of other countries, amongst many, many other techniques.
This article is designed to cover how the best practices on identifying the true origins of spam messages and how to both report them, which enhances UpStream’s Bayesian logic in the future to better protect against them, as well as to block them outright from reaching your organization again via that method.
Identifying how the Spam was Received
So, you’ve received a spam email. What should you do next?
The first question that needs to be answered is “How was this spam email identified?”
Identification normally takes places via one of three situations:
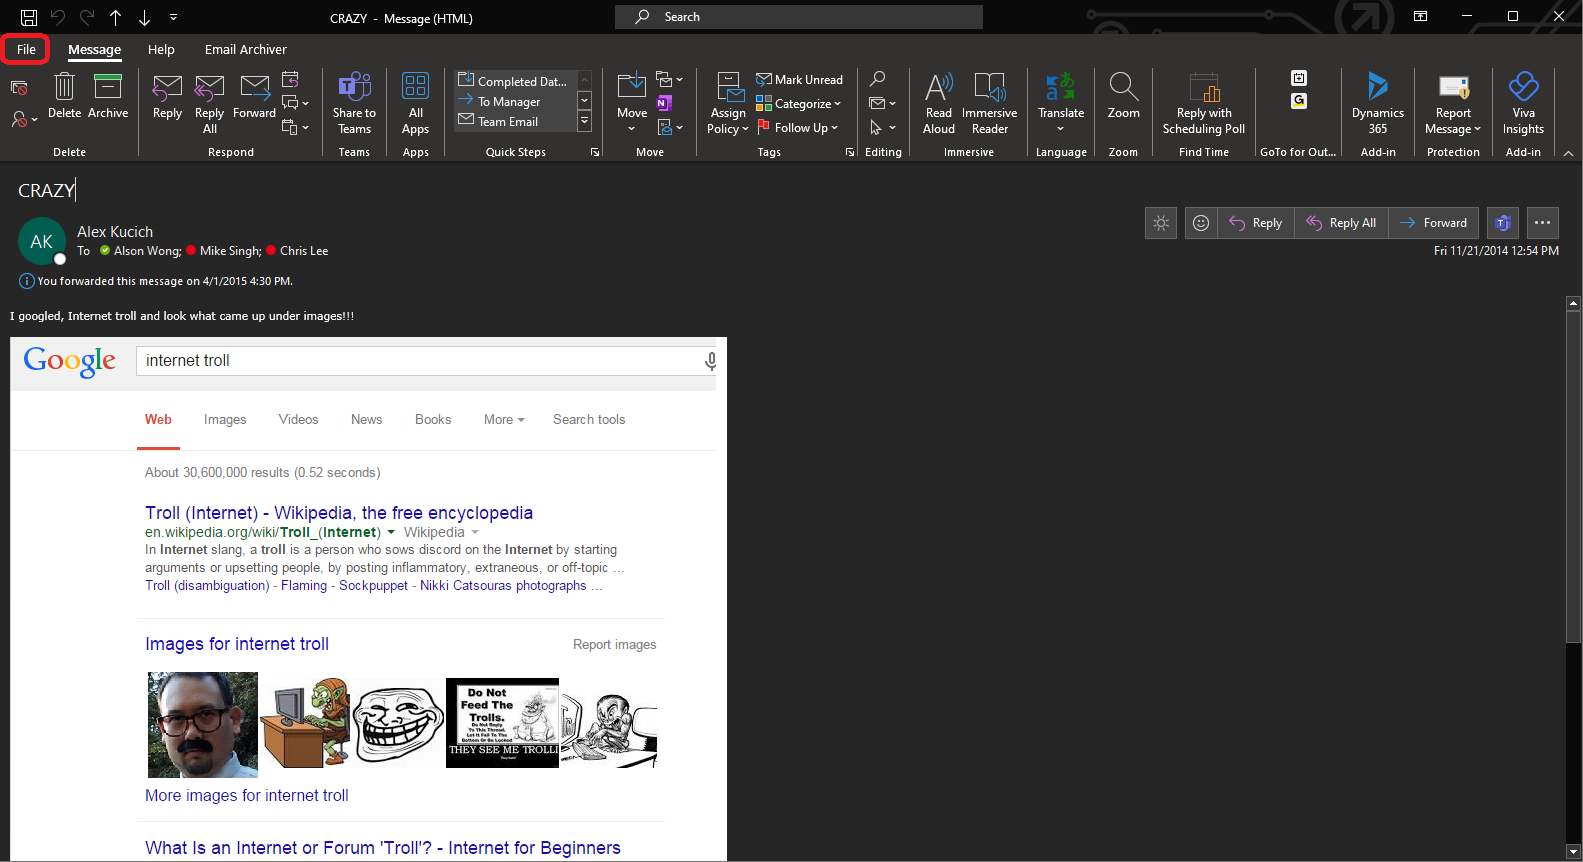
The Spam email was sent directly to you, the email system administrator, and is in your inbox.
The Spam email was received by an end user and was reported to you by them, either via a screenshot or them forwarding the message over to you.
The Spam email was located in the Mail History section inside of your UpStream web portal.
Below is an example of a message containing “spam,” that was sent directly to a user. These are messages that tend to be trying to sell you something or have you click a link, image or something else that can take you to a website (possibly for malicious purposes).

A variation of this is when an end user receives the spam message and sends it to you for blocking, often by simply forwarding it over to you for review.
These are the most common scenarios since email address ‘harvesting’ is rampant and we all wind up on someone’s spam/phishing lists eventually.

Lastly, for email administrators who are already checking their mail delivery logs in UpStream, finding spam in their Mail History queue (usually for those same end users) that can be fine tuned into being blocked for the future is another common scenario.

Once the method of spam receipt has been found, action can then be taken upon it based on that identification.
Taking Action Against Spam
Taking an action against the spam sender is the next action. This process forks out into a couple of categories:
Reporting the spam message to UpStream Support and letting us handle the blocking and future prevention of those messages coming in, or Blocking them yourself after identifying the method the sender used to get through.
Reporting the spam to UpStream Support is the most expedient method for most email administrators and is extremely low overhead; this is great for the occasional spam message that makes it through.
For email administrators who prefer to take the hands on approach themselves or are just transitioning over to UpStream and are tuning their spam allowances for the first time, most of the steps discussed in the Blocking section are the same as the ones UpStream Support uses. Using these procedures will help identify how best to find the wily methods the spammers used to get through and how best to prevent it in the future.
Before either action can be initiated, identification of what are called the Message Headers, which denote the Source email server, the “path” through the Internet that the message took to reach the destination mailbox and any stops or processes along the way that may have scanned or modified it is necessary.
Understanding Message Headers is understanding the true nature and history of that message; this is critically important for the steps beyond and will be discussed immediately below.
Finding the Message Headers
The method used to find the Message Headers vary depending on the email client used to view them. The process used for finding them within the full Desktop Outlook Client (the most commonly used email reading client), Outlook Web Application (OWA) and from within the UpStream portal will be covered here.
It’s not important to be able to interpret the information contained within the Headers right now; that is covered in the Blocking Spam option where understanding the key data points of the Message Headers is critical.
Note: For email clients that are not described below, please review the documentation for locating Email Message Headers in that specific client’s Help guide.
Finding Message Headers within the Desktop Outlook Client:
Locating the Message Headers within an email inside the Outlook Client means first selecting the email under the Inbox (or other folder) view, then double clicking the email to open it fully.
Once opened as an individual email, select File in the upper left hand corner of the email to access the File Menu.
The File Menu provides a few different options for behaviors or movements that can be instituted upon the message. In this case, we’re interested in looking at the Message’s Properties.
Select the Properties button.
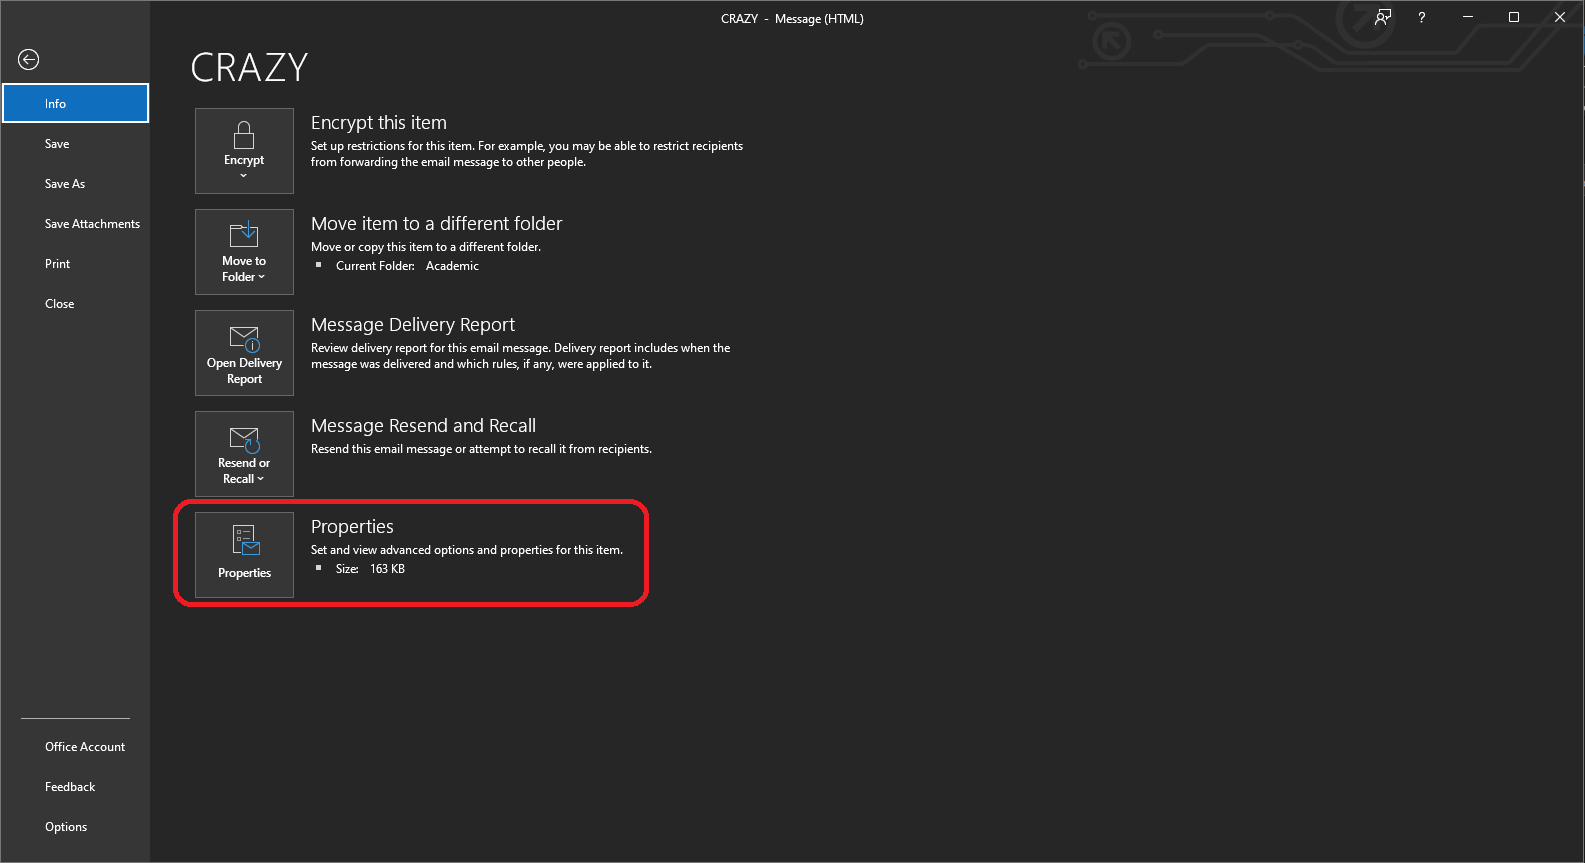
The File Menu will now disappear and be replaced with the Properties dialog box.
The Properties dialog box possesses a field called “Internet Headers,” which are the Message Headers we are looking for.
As the Internet Headers box is fairly small and challenging to read through, it is highly recommended to copy and paste the content contained within this area to a Notepad for easier legibility or preferably to a website that excels at providing broken-out analysis of the content, such as Microsoft’s Message Header Analyzer tool, found here: https://mha.azurewebsites.net/

Finding Message Headers within the Outlook Web Application:
For Outlook Web Application (OWA) users, select the Spam Message in the mailbox, then select the Triple Dot “More” icon on the upper right hand corner of the message.

A tall menu will spawn with many options available for how to treat this message. Find the “View” expanding menu near the bottom of the column and select View Message Details.

The Message Details dialog box will spawn and provide the Headers necessary.
As the Internet Headers box is fairly small and challenging to read through, it is highly recommended to copy and paste the content contained within this area to a Notepad for easier legibility or preferably to a website that excels at providing broken-out analysis of the content, such as Microsoft’s Message Header Analyzer tool, found here: https://mha.azurewebsites.net/

Finding Message Headers within the UpStream Portal:
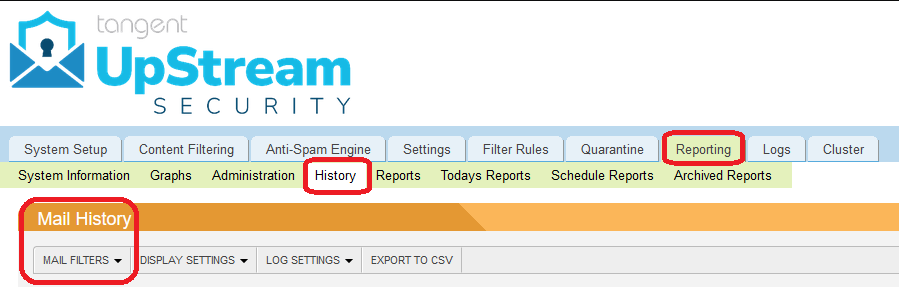
Locating the message within the UpStream Portal is found by selecting Reporting from the top level menu, then selecting History in the contextual submenu.

Once at the Mail History search section, known as Mail Filters, input the parameters of the email such as the Subject Line, Sender Email Address and/or Recipient Email Address in order to drill down on the contents of that day’s emails, then click Apply.
This will filter the list of messages down to the specific spam message that was received.

Click on the Spam Message.
A separate window will open showing the message details.

Select the View Source tab of the message; this will now display the Message Headers.

Now that the Message Headers are available, the choice on how to prevent it in the future can be made.
Reporting Spam to UpStream Support
There are several ways to report spam to UpStream Support:
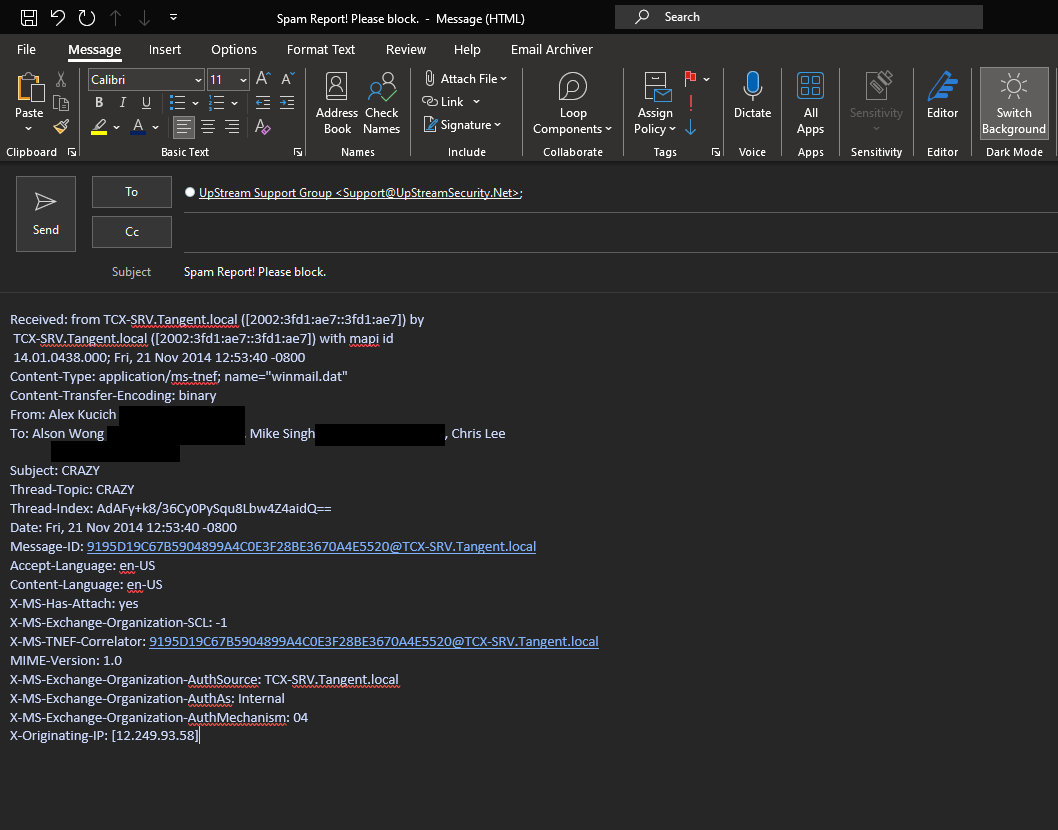
The Header method: simply send us the header information of the message. This involves extracting the full email header of the spam message and emailing it over to Support@UpStreamSecurity.net.
This is the single most effective way to report spam to UpStream Support. The full email header of a spam email enables UpStream Support to identify what IP address the message originated from, the actual “From” address of the message, the country of origin, authentication information, verified message content and much more. The full header of a spam email is its true form and enables us to take the most effective action to prevent and eliminate threats from it and those like it in the future.
With the header information identified from the previous section, paste the contents of it into the body of an email and send it to Support@UpStreamSecurity.net with “Spam Report” in the subject line. UpStream Support will take care of everything else from there and let you know once it has been blocked.
The Forward method: forward the spam itself or the forward of the spam email that was sent to you by your user to Support@UpStreamSecurity.net.
The Forward method is a rapid and convenient method of reporting spam to UpStream, but comes with a couple potential drawbacks. First, a forwarded email contains none of the header information of the original spam message. It will only contain the header information of the forwarded message from you to UpStream Support. This means Support will be feeding through various logs to find that exact message to pull the headers on our side, which is usually possible with the content provided, but occasionally may not be. If it’s not, Support will inquire with you for further information.
Second, it is also possible that because a spam message is being forwarded to us, it could get blocked by our own spam filters or your outgoing spam filter, especially if your outbound traffic is relayed through UpStream. In these scenarios, we may not receive the spam report. UpStream Support will confirm receipt of the message once we block it normally; if such a receipt does not arrive to you within 24 hours, it is likely the message was blocked by our filters and the Header or Screenshot methods (mentioned above and below) are the best options to notify Support.

The Screenshot method: provide a screenshot of the spam email or the filtered results of the Mail History log identifying the spam email to Support@UpStreamSecurity.net. This provides the same information that the Forwarding method above offers, but without the risks of getting blocked.
Providing us with a screenshot of the Spam Email or the UpStream portal’s Mail History results showcasing the spam message can also be very effective in enabling Upstream Support to track down and eliminate spam threats. Please note that any screenshot of a spam email should contain the sending address, recipient address, Date/Time the message was sent and the Subject of the spam email to best enable Upstream Support to identify and take action.
UpStream Support will take care of everything else from there and let you know once it has been blocked.


How to block spam as an Email Administrator
Blocking Spam from the the administrative viewpoint takes a two phase approach: Reporting a message as spam to enhance your domain’s Bayesian database, followed by blocking the sender via one of several methods.
Phase One: Reporting Spam is a means of instructing your UpStream system that the message that is being marked as Spam has traits that it should look for in other emails that may also indicate they are Spam and should be blocked. Reporting is a vital component of the UpStream email security service as it helps us not only eliminate real-time spam email attacks, but also serves to help us configure and customize the UpStream service based on the spam being reported so that we can further safeguard the service and prevent similar attacks from plaguing our clients in the future.
To begin, log into your UpStream portal and navigate to Reporting from the top level menu, then select History in the contextual submenu.
Once at the Mail History search section, known as Mail Filters, input the parameters of the email such as the Subject Line, Sender Email Address and/or Recipient Email Address in order to drill down on the contents of that day’s emails, then click Apply.
This will filter the list of messages down to the specific spam message that was received.

Click on the Spam Message.
A separate window will open showing the message details.

Select the Options tab at the top of the email details box, then click the Mark Message as Spam link.

Phase Two involves taking a secondary, more permanent action by invoking one of the blocking actions listed below. Depending on the scope of the threat (is it a single person? An organization? A country? Keywords?), different blocking methodologies exist that can resolve it long term.
Blocking the Sender by Address
The narrowest kind of block that prevents the largest amount of potential false positives (and consequent excess blockings that can result in failed delivery of messages to your users) is blocking the individual sender of a Spam Email. However, blocking emails by Sender can be a little confusing, since whom we perceive as being the “Sender” can be faked very easily, necessitating a deeper dive into the Message Headers to find out where the message actually originated from.
Note: Wider scope blockades, such as blocking an entire domain (say, Google.Com) or entire top-level domains (like all .Com addresses) are possible using these methods as well, but are generally reserved for more persistent spammers and often have better ways of being achieved, like GeoBlocking or Pattern Filtering.
To effectively block a spam message by email address, domain name or top-level domain, begin by identifying the actual “From Address” of the spam message. Often-times spammers will mask the actual From Address of an email by using an Alias Address.
This Alias Address will be visible to the recipient of the spam message when viewing the message, or when forwarded to the email administrator, but because the Alias Address is often not the actual From Address of the message, blocking it will have no impact (or even have an adverse impact by blocking a potential good sender whose address is being used as the Alias Address). Instead, it is crucial to identify the actual From Address of the spam message.
To perform this identification, locate either the full email Header of the message or the Message Details visible when clicking a message in the Mail History at your UpStream portal (covered in previous sections).
In these Headers, find the following fields right near the beginning of the text: Return-Path: <spam@spam.com>
Nearby, the X-Envelope-From field will contain the actual Sender’s address. This is the address to block.

When viewing the Message Details of an email in the UpStream portal, the From Address and Envelope From Address will be bunched together near the top of the results:

Note that the actual From address of a message will always be the Envelope From Address or X-Envelope-From. If you want to block a message using the email address or domain name of the sender on the UpStream system’s Domain Block List, the email address or domain name must be the one listed in the Envelope From Address.
To block email addresses or entire domain names (operating under the assumption that anyone sending messages to your users from that domain is a spammer), it is best to use the User or Domain Block List. Please contact UpStream Support for a walkthrough on how to use this feature.
To block top-level domains, UpStream’s Pattern Filtering feature should be used. Please contact UpStream Support for a walkthrough on how to use this feature.
Blocking the Sending IP Address or IP Range
Since email addresses are incredibly easy to make and destroy, it’s often a superior choice to block the Sending IP Address of the email server instead. These are less commonly changed than the email address itself and make for better block targets as a result, especially when blocking an entire IP Address Range.
To effectively block the Sender’s IP Address (also known as the Source IP Address) or IP Address Range of a spammer, the actual Sending IP Address of the mail server the spam message originated from must be determined. Because email is often passed between multiple servers during transit, it can be confusing to determine which IP Address to block.
The UpStream Service simplifies this by identifying the Source IP address of the Sender (spammer or otherwise) in the Message Details of every message the UpStream system receives. This is displayed in the Message Details as the Client Address.

You may also identify the Sending IP Address or Source IP Address of an email message or confirm the Client Address is correct by reviewing the Full Email Header of the email message.
To do this, retrieve the full email Headers of the message utilizing one of the options covered in a previous section. Once it is in hand, look for the Received line that shows the pass of the message to the UpStream system your domain is hosted on. The IP address of the server that passed the message to the Upstream service is the Source IP address.

What the above is stating is that ’40.107.220.58’ passed the message to ‘ussfdemo.spamfilter.cloud’. This is the IP address that should be blocked to prevent UpStream from relaying any email it receives from the IP address to your users.
To block IP Addresses and/or IP ranges, UpStream’s Pattern Filtering feature should be used. Please contact UpStream Support for a walkthrough on how to use this feature.
Identifying and Blocking both Standard and Impersonation Spoofing
Email “Spoofing” is a means of deceiving the Recipient of an email that the Sender is someone that they can trust or is otherwise a safe individual to correspond with. This is commonly accomplished by one of the two forms discussed below:
Standard Spoofing – Standard or basic spoofing is when a spammer spoofs the domain name of the recipient domain in the From field of a message. This type of spoofing is designed to deceive the recipient into believing the message was sent either by another person at the recipient’s domain itself, or a third party authorized to send on the recipient domain’s behalf, like a mailing or notification service.
From: Spammer <spammer@yourdomain.com>
To: User <user@yourdomain.com>
This is a near-everyday threat for most organizations and uses the “trust” that we normally have for other employees at the same organization as a social engineering tactic against the recipient. It has become so commonplace that many organizations use a “header” notification on any emails their recipients receive stating that it’s from an external sender, even if the domain of the sender purports to be the same as the recipient, in an effort to tamp down on the amount of clicks these types of messages get.
Impersonation Spoofing – Impersonation or Display Name spoofing is when a spammer spoofs the First and Last Name of a trusted sender in the From field of a message. This is another extremely frequent method of spoofing that spammers use to convince the recipient that the email is coming from a person of authority in order to phish or defraud the user. Often, this type of spam is more effective because the majority of email client software only show the First and Last Name of the sender and not the email address itself, unless the recipient is looking for it.
From: Trusted Person <spammer@spamdomain.com>
To: User <user@yourdomain.com>
Each of these types of Spoofing can be prevented using the UpStream service’s Spoof Protection feature. Please contact UpStream Support for a walkthrough on how to use this capability.
Identifying and Blocking by Content, Links or Attachments
For more complex filtering, UpStream possesses the capability to block emails based on their Content.
Content is identified as characters or strings of basic text in the Header, Subject or Body of email messages. If there is content within an email message that you do not wish to reach your domain, it can be blocked using Pattern Filtering. Please contact UpStream Support for a walkthrough on how to use this feature.
Links are hyperlinks or URLs contained within the Body or Signature of email messages. The UpStream email security service includes a feature called Link Lock that will rewrite and perform time-of-click analysis of all URLs contained within email received by your domain to prevent your users from navigating to malicious URLs used to phish them. Please contact UpStream Support for a walkthrough on how to configure and tune this capability.
Attachments are files that attached to email messages to convey additional information that exists outside of the basic text of an email. These attachments can contain viruses or other malicious code used to compromise your users and your organization’s internal security. The UpStream service has the capability to block or allow any file type you choose. Please contact UpStream Support for a walkthrough on recommendations and selection methods for using this function.
Blocking by Country of Origin (GeoBlocking)
An extremely common scenario occurs where spam is generated from email servers in other countries, especially ones with lax computer and telecommunications laws surrounding fraud and misuse, targeting organizations based in countries that have personnel, reputations or intellectual property that can then be extorted. Due to the lack of enforceable punishment to these international spammers and the low chance of them needing to do any sort of communication or business with most organizations, the concept of GeoBlocking, or disallowing email from entire countries, came to exist as a major and commonly used feature in UpStream.
The UpStream service possesses the capability to identify the Country of Origin of the IP address of the email server and can block any emails coming from them. Allowances can be made for specific IP addresses, domain names or even individual email addresses for organizations that may reside in any otherwise GeoBlocked country.
There are two ways to identify the country of origin of an email message, both from the Mail History section in the UpStream portal.
Locate a spam message within the UpStream Portal by selecting Reporting from the top level menu, then selecting History in the contextual submenu.

Hover your cursor over the IP address of the message in the Client Address field of the Mail History list to display the Country that the IP address belongs to. This would be the country that should be blocked if there is no legitimate traffic coming from this location.

Secondly, if the message is double-clicked, the Message Details view will also list the Country of Origin for identification and GeoBlocking.

With the Source Countries now identified, our GeoBlocking knowledge base article can display the real power and granularity available with this function. Read more about how to use this capability here.